
In the fast-paced digital world, accidental file deletions happen to the best of us. Whether it’s an important document or cherished photos, the panic of losing valuable files is universal. Fortunately, our trusty cloud companion, Google Drive, has a safety net – the Trash folder.
In this step-by-step guide on How to Recover Deleted Files from Google Drive, we’ll explore how to navigate Google Drive’s interface, locate the elusive Trash folder, and effortlessly recover deleted files. Say goodbye to the fear of losing your data as we unravel the simple yet crucial file recovery process in just a few clicks. Let’s dive in and reclaim those lost treasures!
Here is a complete guide to Recover Deleted Files from Google Drive
Understanding Google Drive Trash
1. The Google Drive Trash folder is a safety net for deleted files, providing a temporary holding space before permanent removal. It’s a digital haven where accidentally deleted documents, photos, or videos find a second chance.
2. Deleted files typically remain in the Google Drive Trash for 30 days. During this time, users have the opportunity to recover them and undo the deletion. After 30 days, files are automatically and permanently erased from the Trash, freeing up storage space.
3. Importantly, files residing in the Trash are restorable with a straightforward recovery process, offering users peace of mind in case of accidental deletions.
Steps to Recover Deleted Files
1. Accessing Google Drive
I. Log in to your Google Account: Open your preferred web browser, enter your Google Account credentials, and click on “Sign In.”
II. Navigate to Google Drive: Once signed in, locate the Google Apps menu (represented by nine dots) and select “Drive” to access your Drive dashboard.
2. Locating the Trash folder
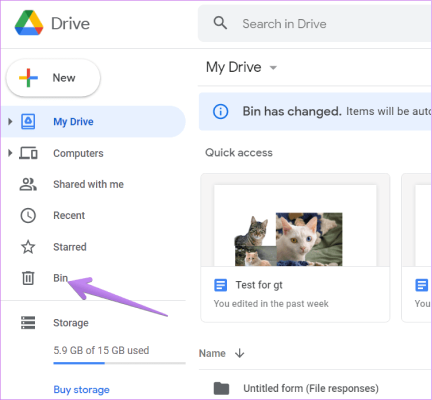
I. Identify the “Trash” or “Bin” option: On the left-hand side panel of Google Drive, look for the “Trash” or “Bin” icon.
II. Access the Trash folder: Click on the “Trash” or “Bin” icon to enter the Trash folder and view your deleted files.
3. Searching for deleted files
I. Use the search bar to locate specific files: Utilize the search bar at the top of the Google Drive interface to search for specific file names or keywords.
II. Scroll through the Trash folder: Browse through the Trash folder manually to visually identify and select the files you wish to recover.
4. Restoring deleted files
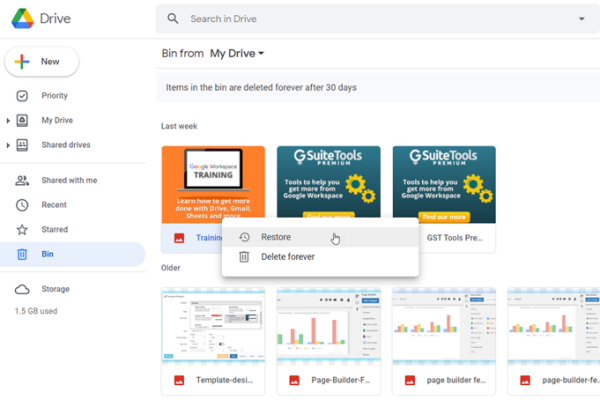
I. Select the files you want to recover: Check the boxes next to those you want to restore within the Trash folder.
II. Click on the “Restore” option: Once files are selected, locate and click on the “Restore” option, typically found at the top of the Trash folder interface.
5. Confirming file restoration
I. Verify that the files are back in the main Drive: Navigate to the main Google Drive dashboard and confirm that the recovered files are now visible.
II. Double-check the file integrity: Open the recovered files to ensure their content and integrity are intact, confirming a successful restoration.
Also See: How to Wirelessly Transfer Files from PC to Android: Step-by-Step Guide
Recovering Files Beyond the Trash Period
1. Overview of the Trash retention period
I. The trash retention period in Google Drive is crucial, as it defines how files remain recoverable after deletion.
II. Typically, deleted files stay in the Trash for 30 days before automatic permanent deletion occurs.
2. Using Google Drive support
I. Navigating to Google Drive Help Center
- Visit the Google Drive Help Center by accessing the Google Apps menu and selecting “Help.”
- Explore the support options available to address various concerns related to file recovery.
II. Submitting a request for file recovery
- Locate the relevant support section for file recovery within the Help Center.
- Follow the instructions to submit a request for file recovery, providing necessary details such as file names and deletion dates.
Preventing Future Data Loss
In the digital realm, safeguarding your data is paramount, and adopting proactive measures can prevent future heartaches associated with data loss.
1. Setting up regular backups
Regularly backing up your files protects against accidental deletions or unforeseen system failures. Google Drive offers an easy-to-use backup feature that automatically stores your files in a secure cloud environment.
2. Utilizing third-party backup solutions
Explore third-party backup solutions that provide an additional layer of security. These solutions often offer advanced features, such as versioning and customizable backup schedules, giving you more control over your data protection strategy.
3. Best practices for file management
Implementing effective file management practices is crucial. Label files, organize them into logical folders, and periodically review and declutter your storage space. Additionally, educate team members on collaborative file-sharing etiquette to minimize the risk of accidental deletions.
By combining these strategies, you create a robust defense against data loss, ensuring the longevity and integrity of your digital assets.
In conclusion, mastering the art of recovering files on Google Drive is valuable, but the key to tranquility lies in prevention. Regular backups, whether through Google Drive’s built-in features or third-party solutions, act as a safety net, shielding your data from unexpected mishaps.
These steps and smart file management practices like clear labeling and organized folders are impenetrable defenses against future data loss. Empower yourself with proactive habits; you’ll recover files effortlessly and create a resilient shield around your digital world. Remember, the best defense combines recovery know-how and preventative measures.
