In the age of smartphones, staying connected comes at a cost—your data usage. Ever been shocked by a hefty mobile bill? Fear not! Our guide on How To Check and Monitor Data Usage in Android Phone is here to make managing data on your Android phone a breeze. From setting limits to taming data-hungry apps, we’ve got your back.
Consider it your digital data diet plan, helping you avoid those surprising overage charges. Let’s dive into the world of bytes and bits, ensuring your phone stays smart without breaking the bank. Welcome to a stress-free, data-savvy smartphone experience!
Here is a complete guide on how to Monitor and Control Data Usage
Assessing Current Data Usage

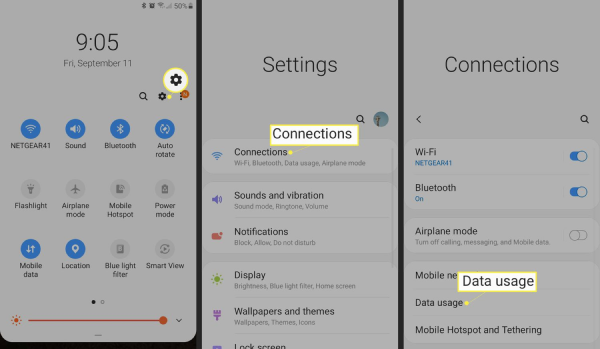
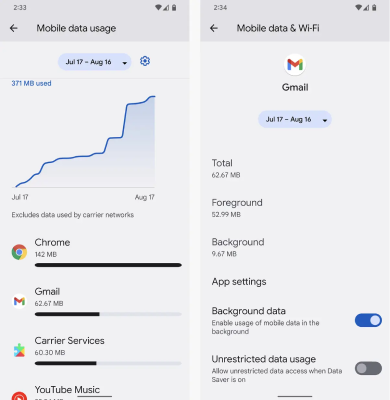
Wondering where your data disappears? Navigate to Android settings, tap “Network & Internet,” then “Mobile network” or “Data usage” to unveil the mystery. This section is a data detective’s notebook, breaking down each app’s data consumption. Identify the culprits and preserve your megabytes.
Some apps are data monsters, sipping your bytes stealthily. Explore your data usage settings to pinpoint greedy apps. Limit their background data or opt for more data-friendly alternatives. Uncover data-spending patterns by delving into usage history. Recognize peak times and activities to tailor your data-saving game. Knowledge is power in outsmarting data gobblers!
Setting Data Usage Limits

1. Accessing data usage settings on Android
Navigate to “Settings,” then “Network & Internet,” and select “Mobile network” or “Data usage.” You’ve now unlocked the door to your data management realm.
2. Setting a data usage limit
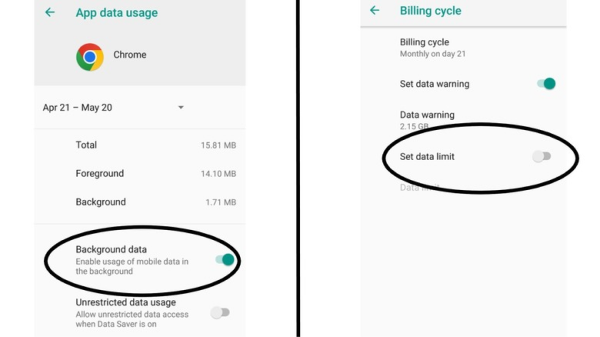
Seize control by defining data boundaries. Tap “Set data limit” to establish a personalized cap within settings. This virtual safety net prevents unexpected overages, putting you in command of your data destiny.
3. Configuring a warning threshold
Avoid data surprises with a personalized warning. Fine-tune your settings to receive a heads-up before surpassing limits. It’s your digital ally, ensuring a smooth ride within your data boundaries. Stay in control, stay worry-free!
Also See: How to Wirelessly Transfer Files from PC to Android: Step-by-Step Guide
Data Saver Mode
1. Activating Data Saver mode
Save your data superhero style! Dive into your Android settings, tap “Network & Internet,” then “Data usage,” and flip the switch on “Data Saver.” Watch your phone transform into an efficient data guardian.
2. How Data Saver mode works
Data Saver is your digital knight in shining armor. Once activated, it restricts background data and trims down data usage for active apps. It’s like putting your phone on a data diet, ensuring only essential bytes make it through.
3. Benefits of using Data Saver
Embrace the perks! Data Saver not only conserves your precious megabytes but also extends battery life. Enjoy a smoother online experience without the data drain. Activate and empower your device!
Managing App Data Usage

1. Reviewing individual app data consumption
Unveil the data drama! Head to your phone settings, tap “Network & Internet,” then “Data usage.” Dive into the list of apps to unveil who the data hogs are. It’s your backstage pass to understanding each app’s data appetite.
2. Restricting background data for specific apps
Play data referee! Choose “Restrict background data” for those sneaky apps within your app settings. It keeps them from munching on data behind the scenes, ensuring they only consume when in the spotlight.
3. Disabling auto-updates over mobile data
Stop the data drain! Disable “Auto-update apps over Wi-Fi only” in your app store settings to prevent apps from gobbling up your mobile data without permission. It’s your data, your rules!
Utilizing Built-in Features
1. Background App Refresh
Master your app refresh game! Navigate to phone settings, tap “Apps,” then “Advanced” or “Battery.” Toggle off “Background App Refresh” to prevent apps from secretly updating and consuming precious data in the background.
2. App data restrictions
Take the reins of your apps! In the app settings menu, explore “Data usage” or “Mobile data,” then select “Restrict app data.” It’s your data diet plan, allowing you to decide which apps get to feast and which stay on a data budget.
3. Sync settings for accounts
Tailor your sync dance! Visit “Accounts” in your settings, choose the account, and fine-tune sync settings. Control the frequency and type of data sync to ensure your accounts stay updated without unnecessary data extravagance.
Optimizing Browser Settings
1. Enabling data-saving features in browsers
Surf smart! Dive into your browser settings and activate “Data Saver” or “Lite Mode.” These features compress web pages, slashing data usage without compromising your browsing experience. It’s like giving your browser a sleek, data-friendly wardrobe.
2. Clearing browser cache and cookies
Give your browser a cleanse! Periodically clear the cache and cookies in your browser settings. It’s like tidying up your digital space, ensuring a smoother browsing experience, and preventing unnecessary data hoarding.
3. Choosing lightweight browsers
Opt for the elegant ones! Consider lightweight browsers like Opera Mini or UC Browser. They offer a streamlined browsing experience, minimizing data consumption while delivering a speedy internet journey. Navigate wisely!
Monitoring Data Usage in Real-Time
1. Installing third-party data monitoring apps
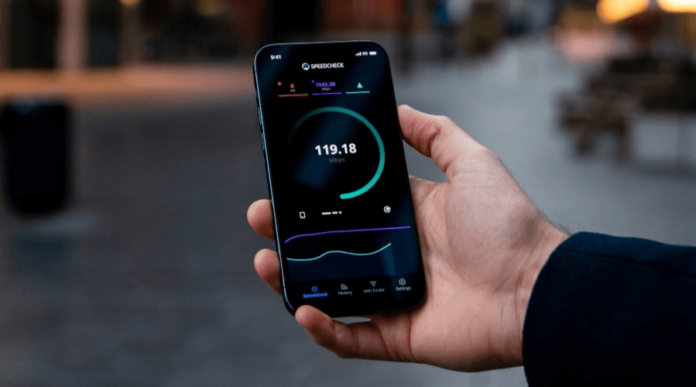
Empower your data watchdog! Explore the app store for data monitoring gems. Install apps like My Data Manager or GlassWire to gain real-time insights into your data consumption. It’s like having a vigilant guardian watching over your data usage.
2. Configuring data alerts
Set your data guardian on alert! Customize alerts within your data monitoring app to receive notifications as you approach predefined usage limits. It’s your virtual assistant, ensuring you stay in the data-safe zone.
3. Reviewing daily data usage reports
Unveil your data diary! Dive into your monitoring app for daily usage reports. It’s a snapshot of your digital habits, helping identify patterns and keep your data spending in check.
Roaming and Data Usage
1. Understanding data roaming settings
Navigate global connectivity! Delve into your phone settings, find “Network & Internet,” and explore “Mobile network” or “Data usage.” Grasp the nuances of data roaming settings to ensure your phone stays savvy while venturing beyond borders.
2. Disabling data while roaming
Dodge data charges abroad! Toggle off “Data Roaming” in your phone settings to prevent your phone from silently munching on expensive international data. It’s your financial shield against bill shocks while exploring foreign lands.
3. Using local SIM cards when traveling
Embrace local connectivity! Consider swapping your SIM card for a local one when traveling. It’s like getting a passport for your phone, offering cost-effective data and seamless communication in your travel destination.
Conclusion
In smartphones, managing data isn’t just about bytes and limits; it’s about empowerment. Armed with the knowledge gained from this guide, you’re now the maestro of your digital orchestra. Whether it’s setting limits, activating Data Saver, or monitoring in real-time, you hold the reins.
Remember, your data is a precious commodity; by adopting these strategies, you’ve become a savvy steward. So, navigate the settings confidently and make your Android experience seamless and cost-effective. Here’s to a world where your data is controlled, your smartphone is smart, and your bills are pleasantly predictable!

